Setting up the Darktable Interface
Darktable has a reputation for its intimidating interface. Indeed, it does take some getting used to. This article introduces some useful Darktable preferences and interface changes. I’ll describe what preferences I’ve changed and why. I’ll also point out some things that might help ease the learning curve.
Make the interface more readable
Many of the changes in this article refer to the Preferences dialog. To open it, click the gear icon in the top right corner of the interface. You can also open the settings with the keyboard shortcut Ctrl+,.
Once you’re in the preferences dialog, you’ll see several tabs on the left and several groups of settings on the right.
Change the theme and add custom CSS
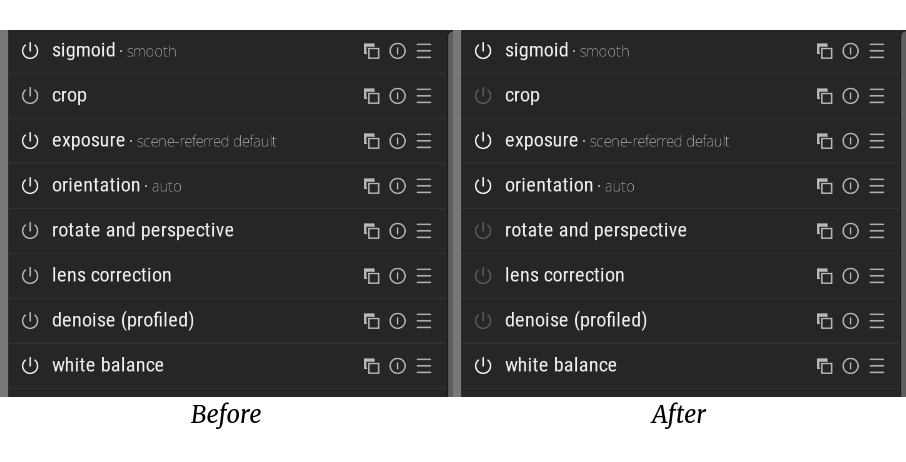
I prefer the high-contrast themes because they make text easier to read, though this is largely up to personal preference. To change the theme, go to the General tab and choose a theme from the drop-down menu. The most important UI change, for me, is to make the state of the on/off buttons of the modules in the darkroom view clearer. Darktable’s interface is customizable. I find it difficult to tell at a glance whether a module is on or off, so I add the following CSS to make the inactive module buttons darker.
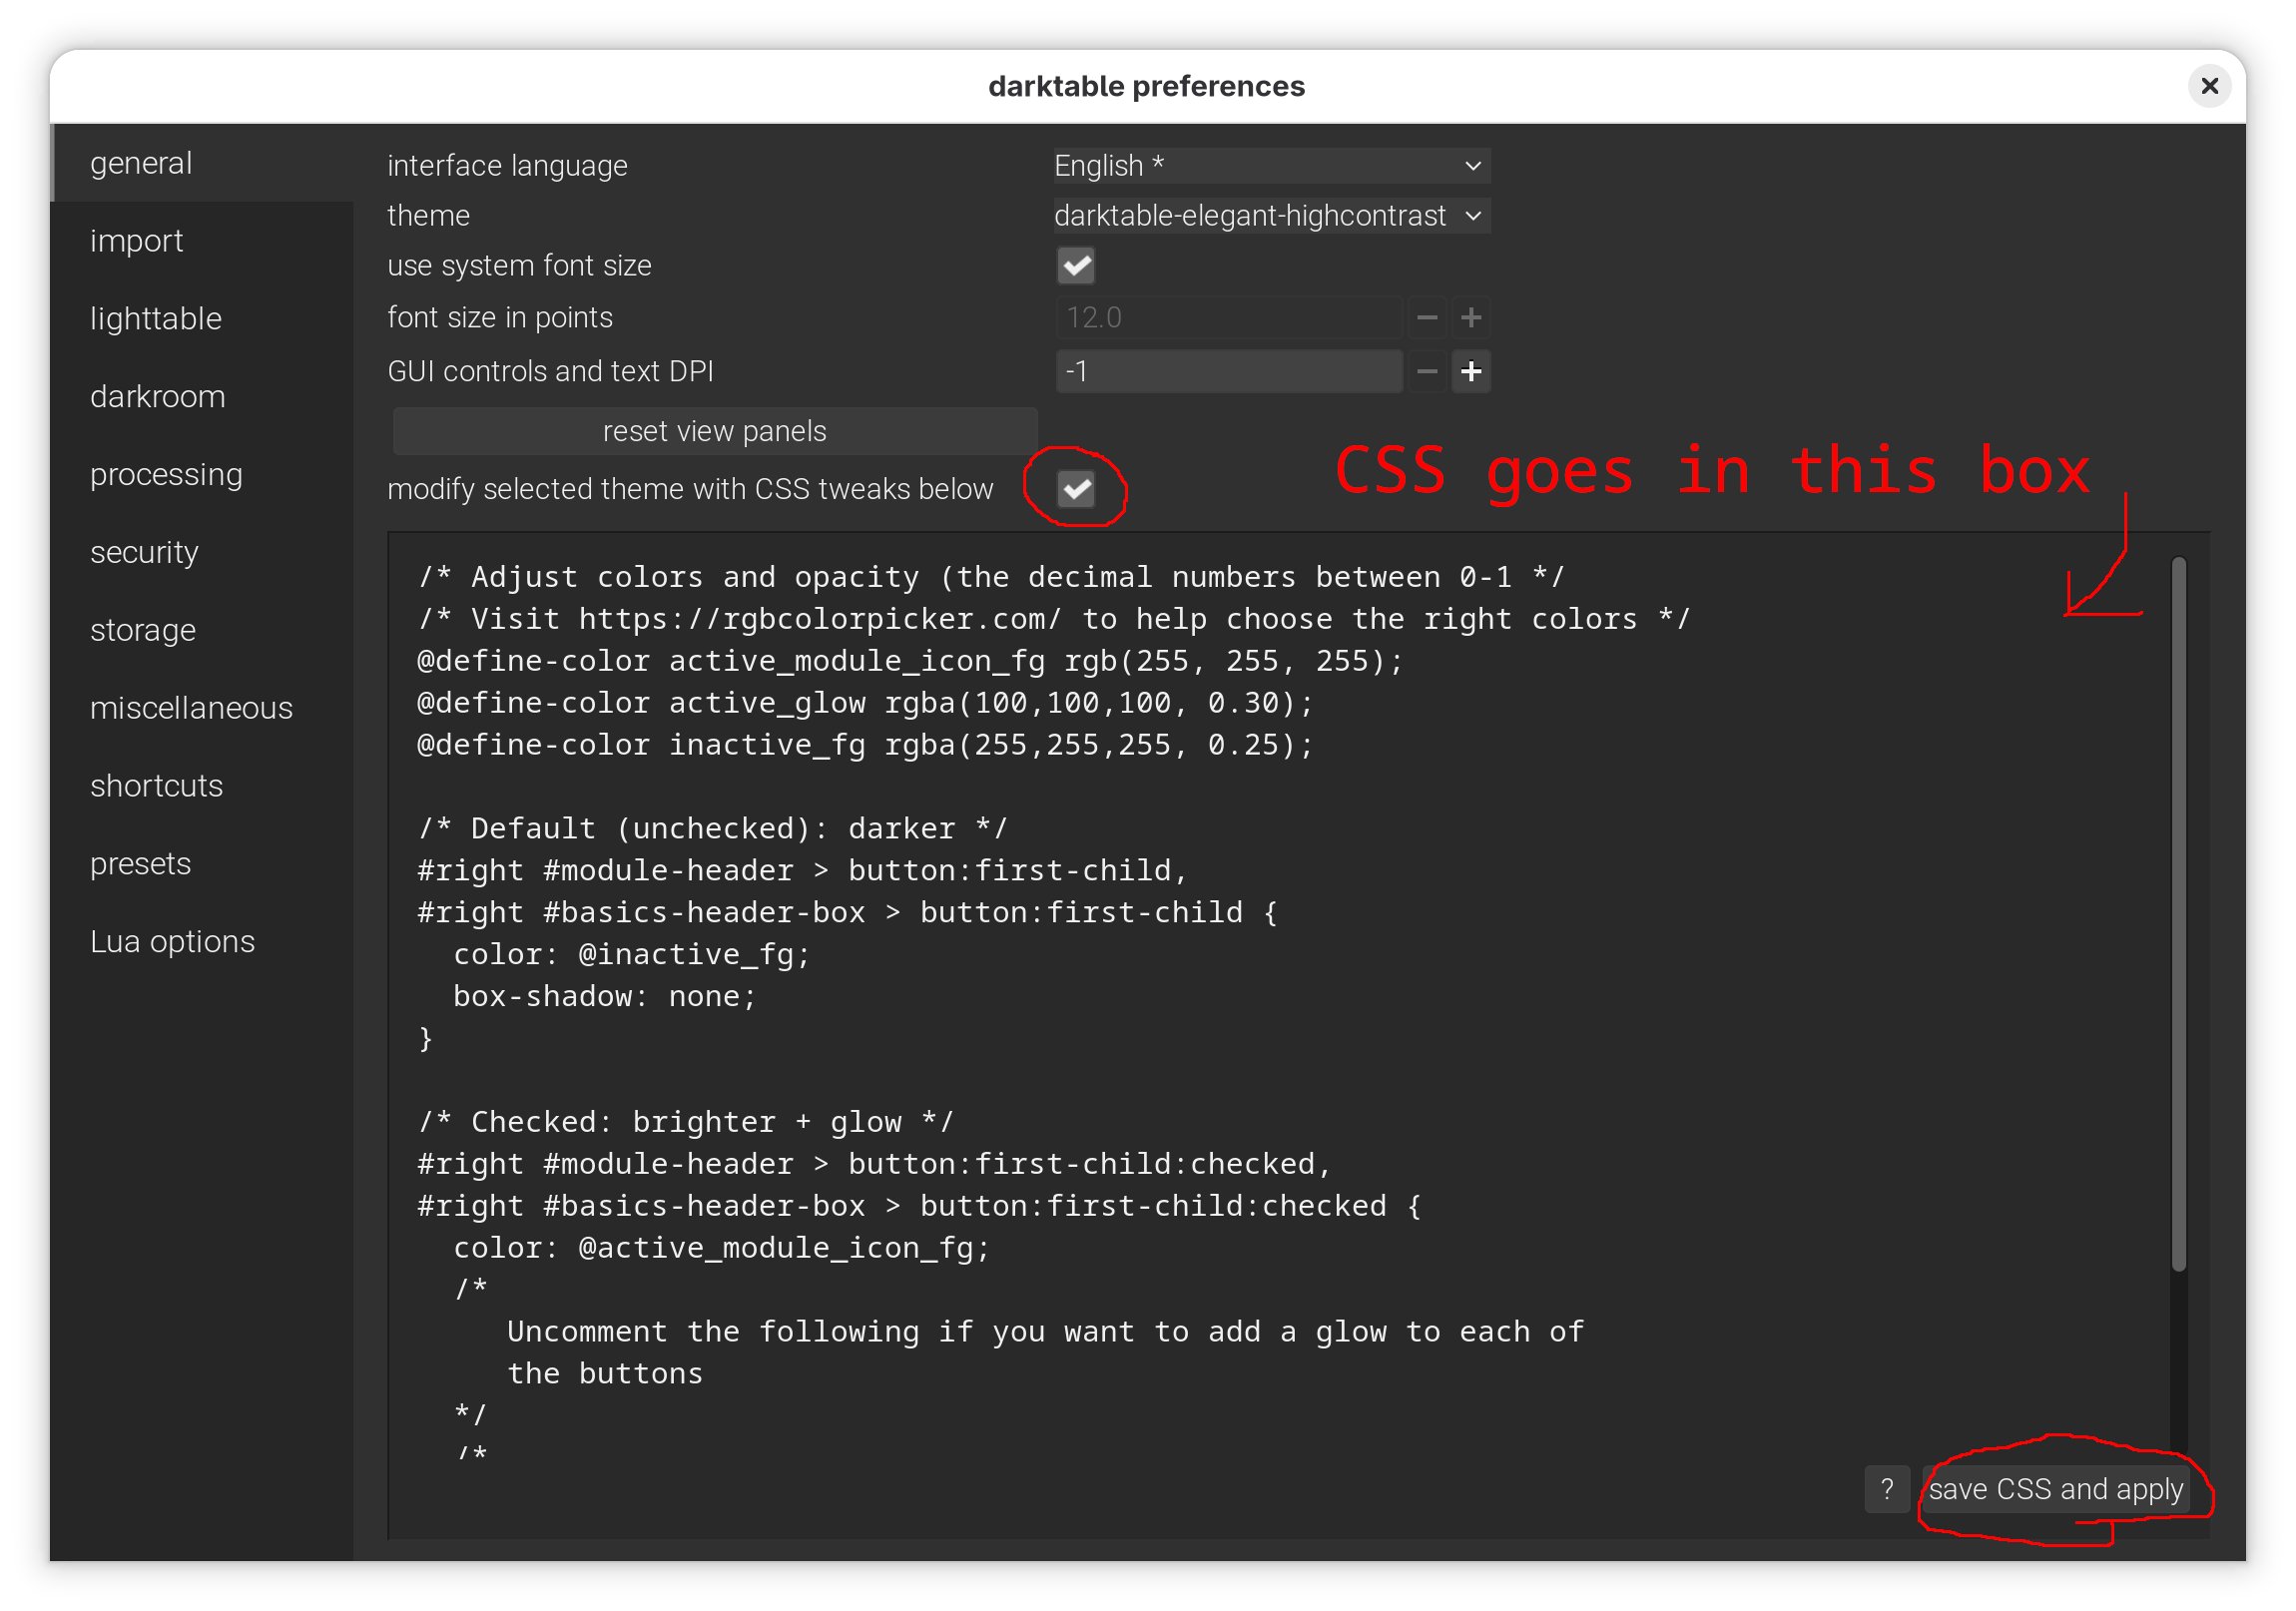
/* Adjust colors and opacity (the decimal numbers between 0-1) */
@define-color active_module_icon_fg rgb(255, 255, 255);
@define-color active_glow rgba(100,100,100, 0.30);
@define-color inactive_fg rgba(255,255,255, 0.25);

/* Default (unchecked): darker */
#right #module-header > button:first-child,
#right #basics-header-box > button:first-child {
  color: @inactive_fg;
  box-shadow: none;
}

/* Checked: brighter + glow */
#right #module-header > button:first-child:checked,
#right #basics-header-box > button:first-child:checked {
  color: @active_module_icon_fg;
  /*
     Uncomment the following if you want to add a glow to each of
     the buttons
  */
  /*
  box-shadow:
    0 0 0 1px rgba(255, 255, 255, 0.35),
    0 0 2px 3px @active_glow;
  */
}
Here’s an example of the CSS before and after. Notice how the power buttons show their active/inactive state more clearly.
Make navigation and input more comfortable
Keeping the module sidebars clean
The light table is where you manage your image collections. You can rate and cull images here and also do other things like set image metadata and export images. The main change that I make to the preferences here is to “expand a single utility module at a time.” When this setting is on, opening one module will automatically collapse other modules. This is another setting that comes down to personal preference, though it may be useful for users with smaller screens. I use it to keep the interface clean.
Adjusting the “no-click” workflow
Darktable has what it calls a “no-click workflow.” In this workflow, you don’t have to click on images in the light table—instead, you just hover over them and use keyboard shortcuts to do things with those images. This workflow is powerful and is my preferred way of working within Darktable. You have to be careful, though—to honor the no-click workflow, Darktable applies actions to hovered images even when other images are selected. This means that you might apply star ratings to the wrong images if you aren’t paying attention to where your mouse is. In practice, I’ve rarely had trouble with it, but if you don’t like this behavior, you can change it by unchecking “Prioritize the hovered image over the selected images” in the light table tab.
One other notable option is what happens when you rate an image one star with the 1 key on your keyboard. By default, pressing this keyboard shortcut more than once toggles the rating between unrated and one star. If you want to make it idempotent, i.e. to just set the rating to one star and never toggle it, check the option for “rating an image one star twice will not zero out the rating.”
Changing what scrolling does in the modules list
One thing I found confusing when I first started using Darktable was the scroll behavior in the darkroom view. By default, the mouse wheel scrolls the sliders in the modules rather than scrolling the list of modules themselves. This runs contrary to the behavior of most programs that I’ve ever used, and it was irritating to accidentally change a setting when I wanted to scroll the modules list, instead.
I eventually learned that you can scroll the module list by holding Ctrl+Alt+scroll. Now that I’m used to it, I naturally reach for that key combo and I get the most use out of my mouse wheel. If, however, you’re just starting and you find the default behavior hard to wrap your head around, then you can change this by checking “mouse wheel scrolls modules side panel by default” under the Miscellaneous tab in the preferences dialog. When this is checked, the side panel will scroll by default, and you can move individual sliders by holding the Ctrl key.
Processing settings: choose between Sigmoid and Filmic RGB
The main thing you might want to change here is the option for “auto-apply pixel workflow defaults.” In my version of Darktable, 5.2.1, the default is “scene-referred (sigmoid).” The other option you might consider is “scene-referred (filmic).” These two options differ by which module they enable for mapping the input image to the dynamic range of the display. I’m not really clear on the technical details, but the modules are an integral part of the modern image processing workflow in Darktable. They map the raw image’s color space to a color space that your monitor can produce.
The Sigmoid module is relatively straightforward to use. It can control image contrast and also allows you to leave more room for shadows or highlights with the “skew” slider. I like to start by choosing the “smooth” preset from the preset menu on the module because this does a good job of correcting color shifts in brighter colors.
Filmic RGB was the default for several versions of Darktable, but was replaced in favor of Sigmoid in version 5.2. Both have their benefits. If you have the time, I recommend Boris Hajdukovic’s extensive comparison video, complete with many helpful examples. His channel is a great resource for learning how to develop images with Darktable, and I learn a lot just by watching him use the different modules. Shout out to him for creating such great content!
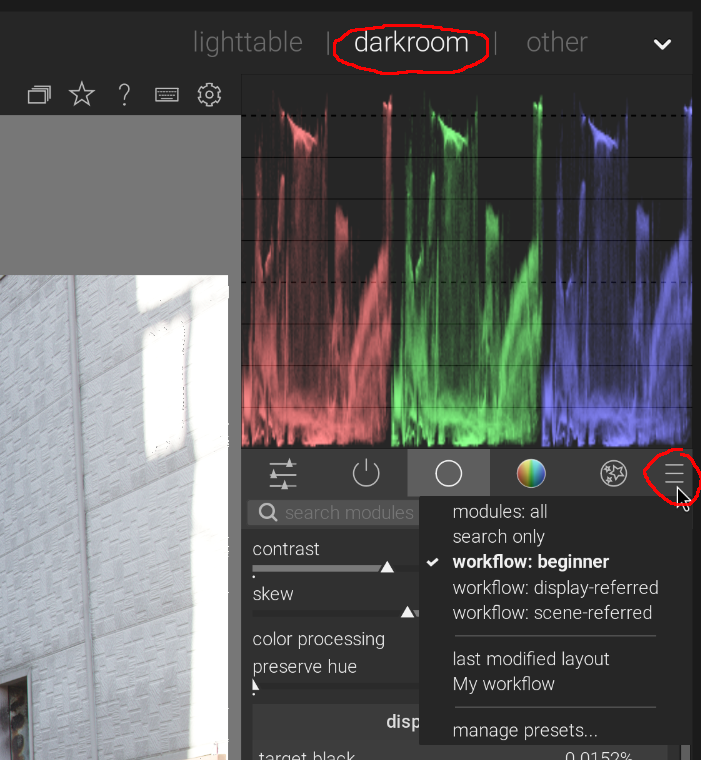
Setting up the darkroom interface
The darkroom view is where you’ll spend a lot of time editing your images, so it’s important to choose a workflow that works for you and to get familiar with it. Aside from the various settings in the Preferences dialog, there are also several changes that you can make to customize your workflow. The main change you might make is to choose the default set of modules.
Customizing the list of modules
When editing an image in Darktable, you have a lot of modules available to you in the sidebar on the right, and you can often use several different modules to accomplish the same task. If the number of modules feels intimidating, you can select the “workflow: beginner” module set to pare down the modules to only the most basic ones. You can get great results using only these modules, and once you know how to use them well, you can consider switching to the “workflow: scene-referred” module set.
If you’re just starting out with Darktable, I recommend Kevin Ajili’s Darktable workflow walkthrough. His video covers how to customize your module list and walks through all the bread-and-butter modules you’d need to develop a photo in Darktable.
Optional workflow tweaks
Setting keyboard shortcuts
If you’re just beginning, you probably don’t need to set your own keyboard shortcuts. However, you can quickly view all available keyboard shortcuts by holding down the H key. You’ll find the keyboard shortcuts for the darkroom view under the “Processing modules” section. Learning keyboard shortcuts goes a long way toward speeding up your workflow.
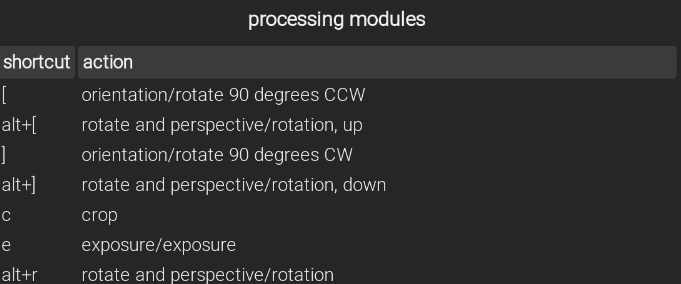
Below is a list of some of the keyboard shortcuts I use most often. These keyboard shortcuts will work anywhere within Darktable.
| Shortcut | Action |
|---|---|
| d | Switch between the light table and darkroom views to edit your images |
| l | Switch to the light table view to view and manage your images |
| 1, 2, 3, 4, 5 | Add star ratings to images |
| r | Reject images, for example if they’re blurry |
| F1, F2, F3, F4 | Add color labels to images; I add these to select images from multiple filmrolls to export them all at once |
I don’t change any of the default settings, although I did add a shortcut key to open the crop module since I use it a lot. You can define keyboard shortcuts through the shortcuts tab, but the recommended way is to press the little keyboard icon in the top right next to the preferences gear icon. Then, hover over the module or control that you want to assign a keyboard shortcut to. Finally, press the keyboard shortcut.
Image import paths
Import settings can be changed in both the preferences dialog and the import dialog itself. First, you should set the location for your filmrolls, which is Darktable’s term for a folder with images in it. Next, you can customize the filmroll name. Here are the settings I use:
| Setting | My change |
|---|---|
| base filmroll’s directory | $(PICTURES_FOLDER)/100 RAW files |
| filmroll name | $(YEAR)$(MONTH)$(DAY) $(JOBCODE) |
See the Darktable manual for a list of the variables you can use in these settings.
I like to prefix my folder names with numbers to keep them in a set order. In this case, 100 represents the first step in the workflow, raw images. Other folders include 200-series for exports and 400-series for images from mobile devices, which I sync with Syncthing. You can read more about image categorization on my blog.
I let Darktable rename my files as it imports them, but if you don’t want that to happen, you can check the option “Keep original filename.” Then, the images that you import will keep the names that the camera gave them. You get just what it says on the box.
Conclusion
This article sums up pretty much all of the settings I change in Darktable. Through the videos and YouTube channels I’ve linked to, I’m constantly picking up little things about how to use Darktable more effectively. The changes described in this article serve as what I see as a great starting point.