Darktable for Beginners: How to Import Photos from an SD Card or Camera
Contents
Darktable is great for managing and developing your photographs, but its flexibility can be a little overwhelming for new users. When I first got started, I felt the same way. Now that I’m familiar with the program, I believe its interface is one of its strengths, despite the learning curve.
The program gives you great control over how you organize your photos. A well-organized photo collection helps improve productivity by creating the foundation of a streamlined photo development workflow. It can also save hours later when you’re looking for that one photo from that trip to Japan eight years ago. I write more about organizing photos in another article.
This tutorial shows how to import images from a camera or SD card into Darktable. Darktable also lets you reference photos in place (without copying them), but this article focuses on the copy & import process. With that in mind, let’s learn how to import your first set of images into Darktable.
Getting ready to import
Here’s a quick walk-through of the process. First things first: make sure you insert your SD card or connect your camera to your computer.
Then, from Darktable’s main view, click on the Import tab and select “copy & import….” This will open a dialog where you’ll tell Darktable how to import the images. The screenshot below shows where the button is located.
Do note that during this process, Darktable will copy your images from your device into folders on your computer. It never touches the original files.
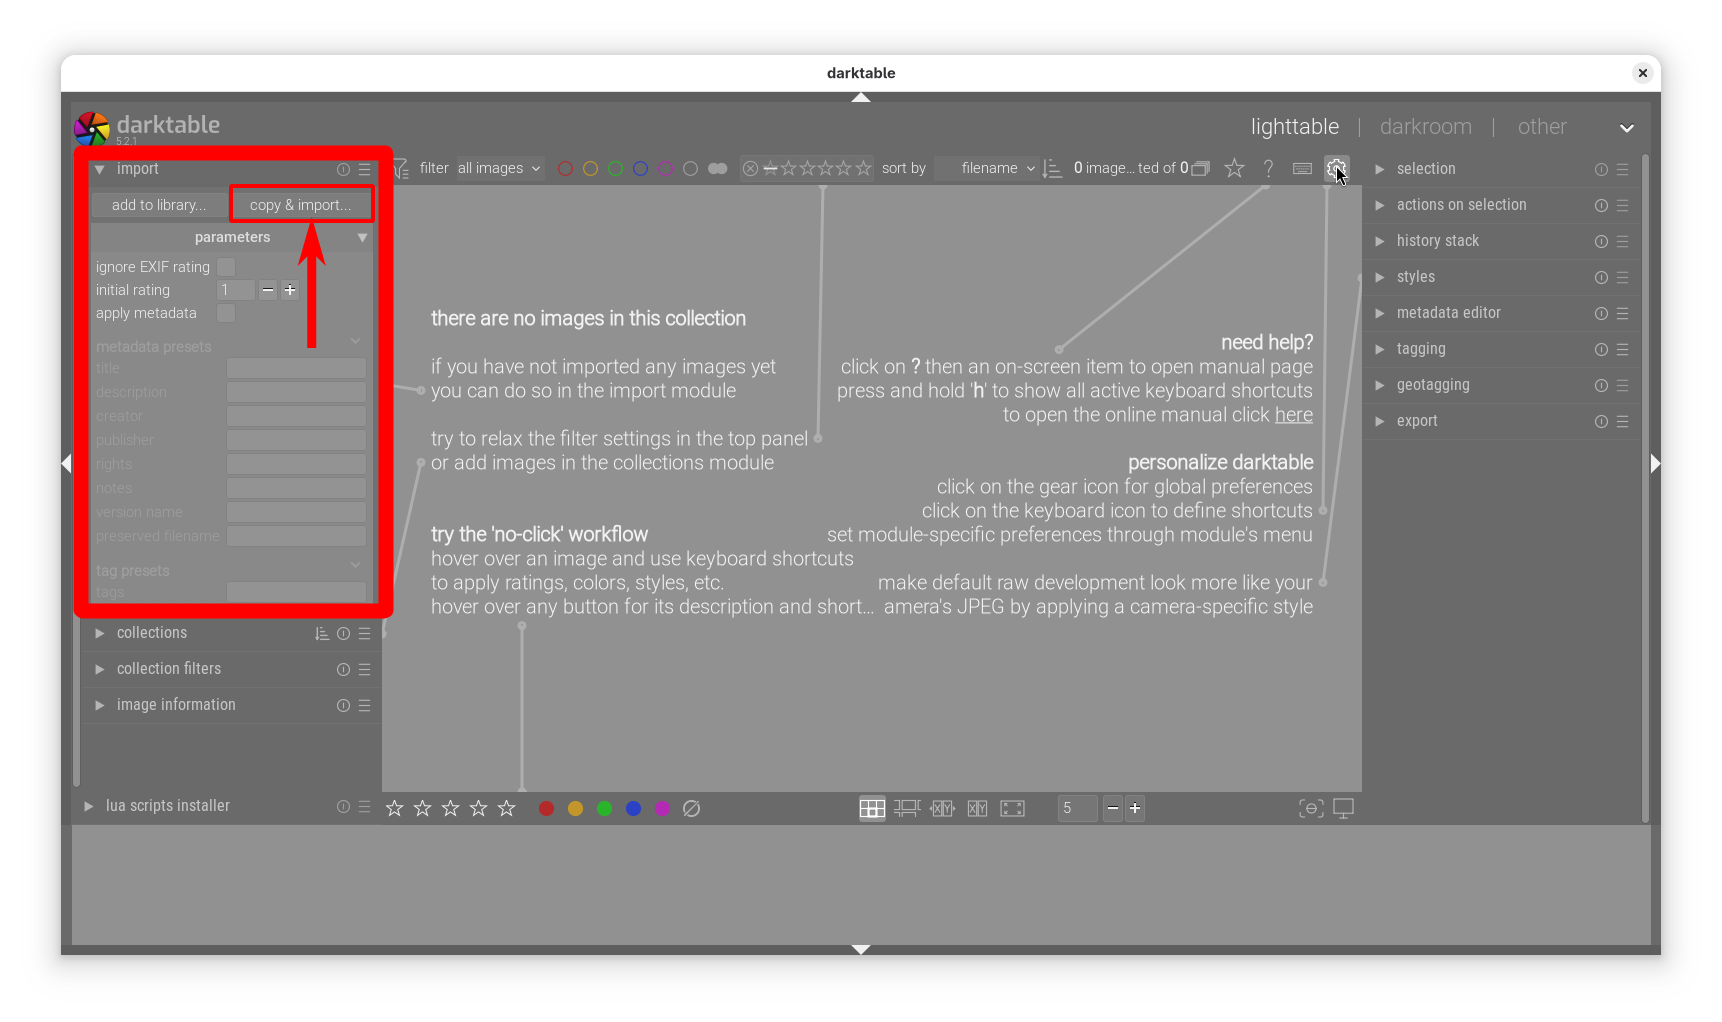
Click the copy & import button to open the dialog where you’ll import your images.
After you click on it, you will see the copy & import dialog. The gist of the import process is this: select the device and folder that contains your photos, choose which photos go together (if not all of them), give them a name in the import job field, enter the date of the group of photos if not today, then click copy & import. The import job name will become part of the filmroll name.
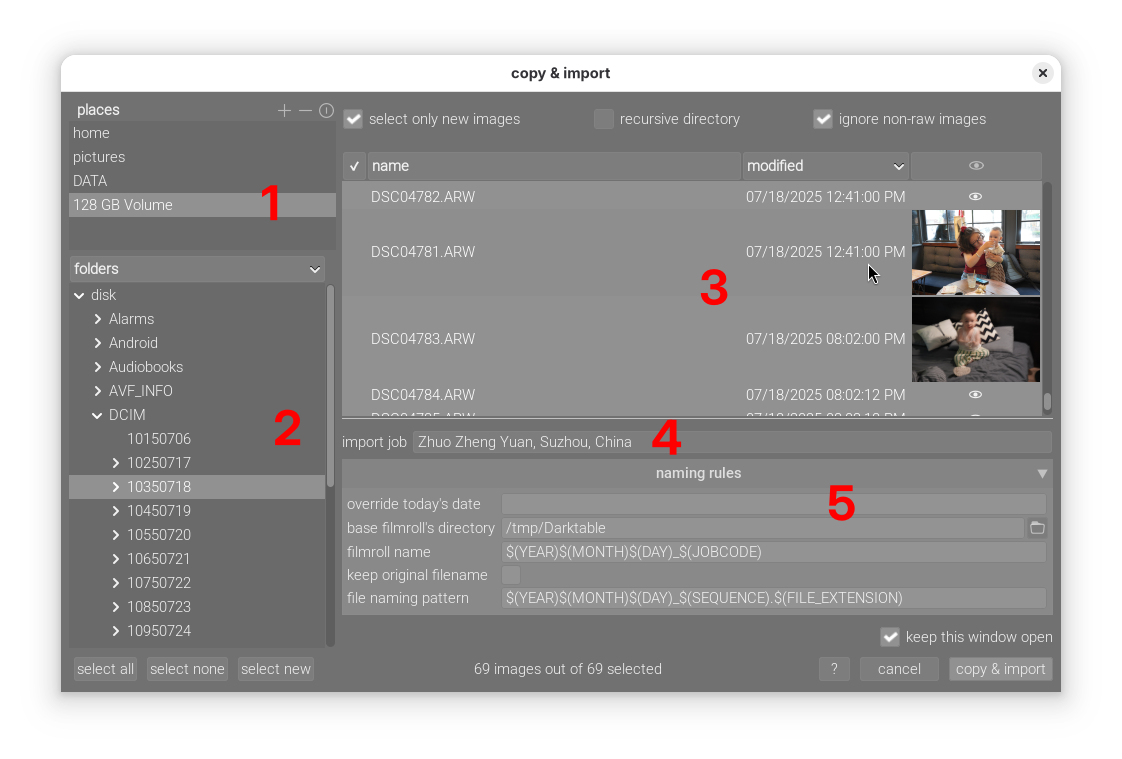
In the copy & import dialog, choose the location you want to import from, then select the images to import.
Here are the import steps in detail:
- Select your SD card from the list of places.
- Find the folder on the device from which you want to import images.
- Inspect your images by clicking on the eye icon to load a preview, then select the images you want to group into a filmroll.
- Once you’ve selected the photos that you want to go together, give that group a descriptive name. That might include the subject, the location, or both. Darktable calls this description an “import job” or “job code.” By default, the job code is used as part of the filmroll name.
- Set up the naming rules. You’ll typically only have to change these settings once. See below for a description of the settings.
- Click “copy & import” to start the import process.
Once you’ve set up your naming rules, the import process can generally be done quite quickly.
The naming rules section
In the naming rules section, you can set up your desired folder structure and image naming rules. I describe what each setting does below, but refer to the relevant section of the Darktable manual for details.
- override today's date
By default, Darktable uses today’s date as part of the imported file and filmroll names. If the photos weren’t taken today, you can use this setting to change the date that Darktable uses.
- base filmroll's directory
This is where your filmrolls will be created. For me, this is set to
$(FOLDER.PICTURES)/100 Raw files. The default creates a folder called Darktable in your computer’s Pictures folder. You can leave it that way if you want.- filmroll name
This is the template that Darktable uses to name each image folder (filmroll). The default works fairly well, naming folders like
20201231_New Year's Eve. See the section filmroll naming considerations below for the pros and cons of different naming schemes.- keep original filename
By default, Darktable will rename your imported images. If you don’t want that, you can check this box. When this is checked, the next setting is ignored and your photos will keep whatever name your camera gave them.
- file naming pattern
Darktable uses this pattern to rename the copied images. I leave this on the default setting because I rarely need to find a file by name, so the particular naming scheme isn't critical.
Before you click “copy & import,” you can check the box for “keep this window open” if you plan to import multiple filmrolls at once. I always check this box because I usually do my importing in batches.
Tips and tricks
Choosing photos to group into filmrolls
I like to sort my images by shooting location into separate filmrolls, so I look at the preview to remember where the photos were, then I look for gaps in the “modified” time of the image list. In the screenshot above, there’s a seven-hour gap between the two photos with previews. This is how I figure out which photos to group into a filmroll. You can select multiple photos by clicking on the last photo and then shift-clicking to select a range of photos.
Using override today’s date
If I’m not importing on the same day of the shoot (which is often), I type in the date of the photo shoot in YYYY-MM-DD format. If your camera’s date/time setting is accurate and you want to use the date from the images, see filmroll naming considerations below.
Checking your naming rules
When you’re just getting started, you may not be sure exactly how Darktable will import your images. One thing I’ve found really helpful is to try importing just a few images, then inspecting the results in my file manager to see how things went. If you like the results, then you can import the rest of your photos with greater confidence. If not, then you can change the naming patterns without any big trouble.
Naming (and renaming) filmrolls
If you’re worried about forgetting to override the date for each import session, you can tell Darktable to use the date from the image, instead. This way, when you import photos from last month’s birthday party, your filmroll names go from 20250921_Timmy's birthday to 20250826_Timmy's birthday.
The key is in using the correct variables. Darktable’s variables $(YEAR), $(MONTH), and $(DATE) refer to today’s date. To use the date from each image, add EXIF. to the date variable names. For example, you could change your filmroll name to $(EXIF.YEAR)$(EXIF.MONTH)$(EXIF.DAY)_$(JOBCODE), which would give you the same format as Darktable’s default, but using the image date instead of today’s date. This way, you don’t have to type in the date for each filmroll that you import.
One potential drawback is that if your camera’s time setting is inaccurate or you are taking pictures around midnight, images from one shoot might get separated into multiple folders. If you want all your images from your trip to go in one folder, you should consider using the Darktable default and setting the date manually with override today’s date. I’ve found this method to be the most flexible and reliable.
It’s best to get the filmroll name right the first time because changing it after the fact is a little tedious. If you change the name of the folder of a filmroll, you have to let Darktable know about the change by right-clicking the filmroll in the collections module and selecting “update path to files….” Admittedly, it’s not the most convenient user interface, but once you get familiar with the import process, you’ll rarely ever have to do this.
By now, you should be well on your way to importing your images from your SD card or camera into Darktable like a pro. While the configuration I’ve described here works well for me, you should try experimenting with different organization schemes to find what works for you. Check out Darktable’s user manual for a list of variables you can use in the name templates. If you want to modify the variables, for example by changing the job code to uppercase or lowercase, look at the string substitution patterns on the same page.
Once you get everything set up, Darktable remembers your settings, making the import process quick and efficient. with practice, the import process takes seconds and gives you more time to focus on actually developing your photos.